8.1 Resource Constrained Transfer
When an entity requires the use of something to complete the movement
between locations, the KSL’s Resource class can be used to model the
situation. In this case, the physical (e.g. distance) aspects of
the movement are not of interest; however, the time that may be constrained
by the availability of the transport mechanism should be part of the modeling. For this situation, it is sufficient to
model the transport mechanism with a resource (or resource pool). We will illustrate
the approach by enhancing the test and repair example from Section 7.1.3.
8.1.1 Test and Repair with Resource Constrained Transfer
Recall that in the test and repair shop, parts follow 1 of 4 different test plans through the shop. Each part first goes to the diagnostic station where it determines the sequence of stations that it will visit via an assignment of a test plan. After being diagnosed, it then proceeds to the first station in its test plan. In the example, it was assumed that a worker (from somewhere) was always available to move the part to the next station and that the transfer time took between 2-4 minutes uniformly distributed. The diagnostic station had two diagnostic machines and each test station had 1 testing machine. Finally, the repair station had 3 workers that performed the necessary repairs on the parts after testing.
An implicit assumption in the model was that there was a worker staffing each of the two diagnostic machines (1 worker for each machine) and that there was a worker assigned to each test station. The modeling of the workers was not a key component of the modeling because the machines cannot operate without the worker. Thus, seizing the machine is essentially the same as seizing the worker.
In this section, the use of the workers to move the entities and to staff the stations will be explicitly modeled. Assume that there are 2 workers at the diagnostic station, 1 worker per testing station, and 3 workers at the repair station. Thus, there are a total of 8 workers in the system. For simplicity, assume that any of these 8 workers are capable of moving parts between the stations. For example, when a part completes its operation at the diagnostic station, any worker in the system can carry the part to the next station. In reality, it may be useful to assign certain workers to certain transfers (e.g. diagnostic workers move parts to the part’s first station); however, for simplicity these issues will be ignored and any worker will be allowed to do any transport in this example.
This approach also requires that any worker is capable of noticing that a part needs movement. For example, perhaps the part is put in a basket and a light goes on indicating that the part needs movement. When a part requires movement, it will wait for the next available idle worker to complete the movement. In this situation, a worker may be busy tending to a part in process at a station or the worker may be busy moving a part between stations. Figure 8.1 illustrates the new situation for the test and repair shop involving the use of workers.
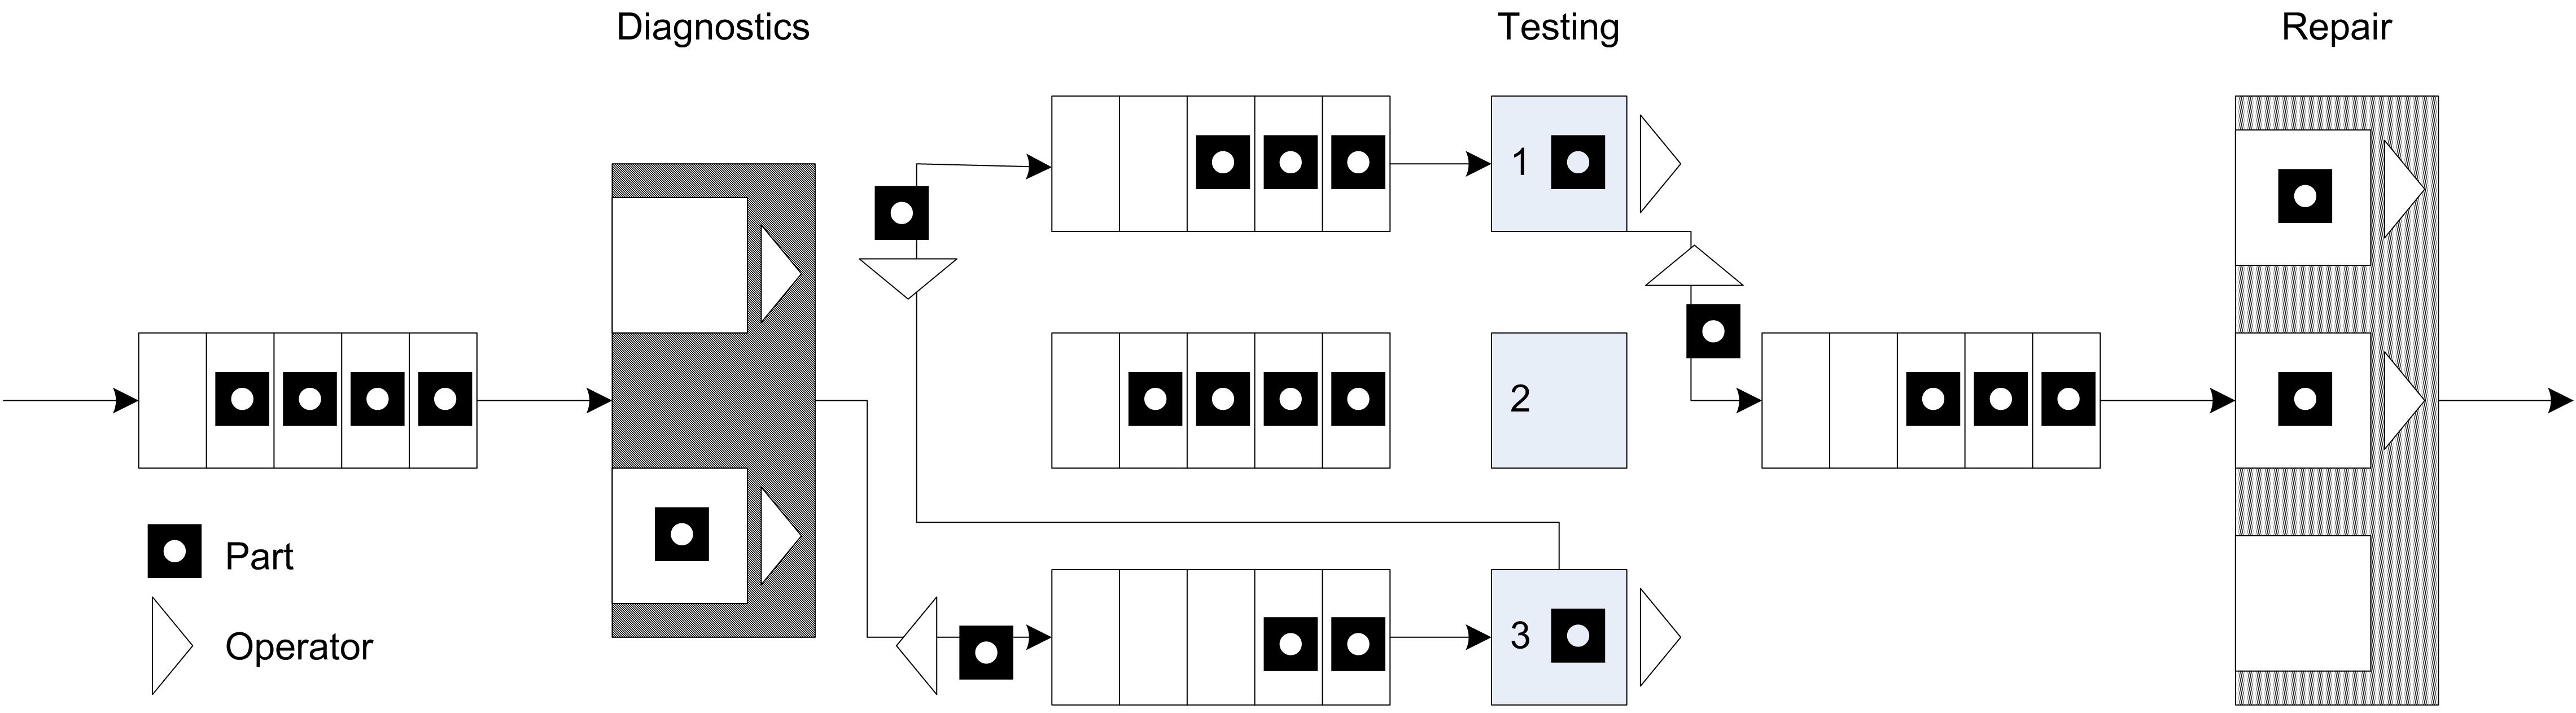
Figure 8.1: Test and repair shop with workers providing the movement
Since workers are required for the processing of parts at the stations and they might have to perform the movement of parts between stations, the workers must be shared between two activities. Thus, when a worker completes one activity a mechanism is needed to indicate which activity should proceed next. A simple mechanism is to assign a priority to one of the tasks. Thus, it seems reasonable to assume that parts waiting for processing at a station are given priority over parts that require movement between stations.
Figure 8.2 illustrates an activity diagram for the situation where the workers are called for the transport. In the figure, each worker is indicated individually. For example, DW1 refers to worker 1 at the diagnostic station. In the figure, the visitation of each part to a different test station is illustrated with a loop back to the transfer time after the testing delay. Thus, the figure represents all three test stations with the test station queue, testing delay, and test machine combination. Unfortunately, this does not explicitly indicate that a test worker is assigned to each test station individually. In particular, the other resources marked TW2 and TW3 should technically have seize and release arrows associated with them for the testing activity at a particular station.
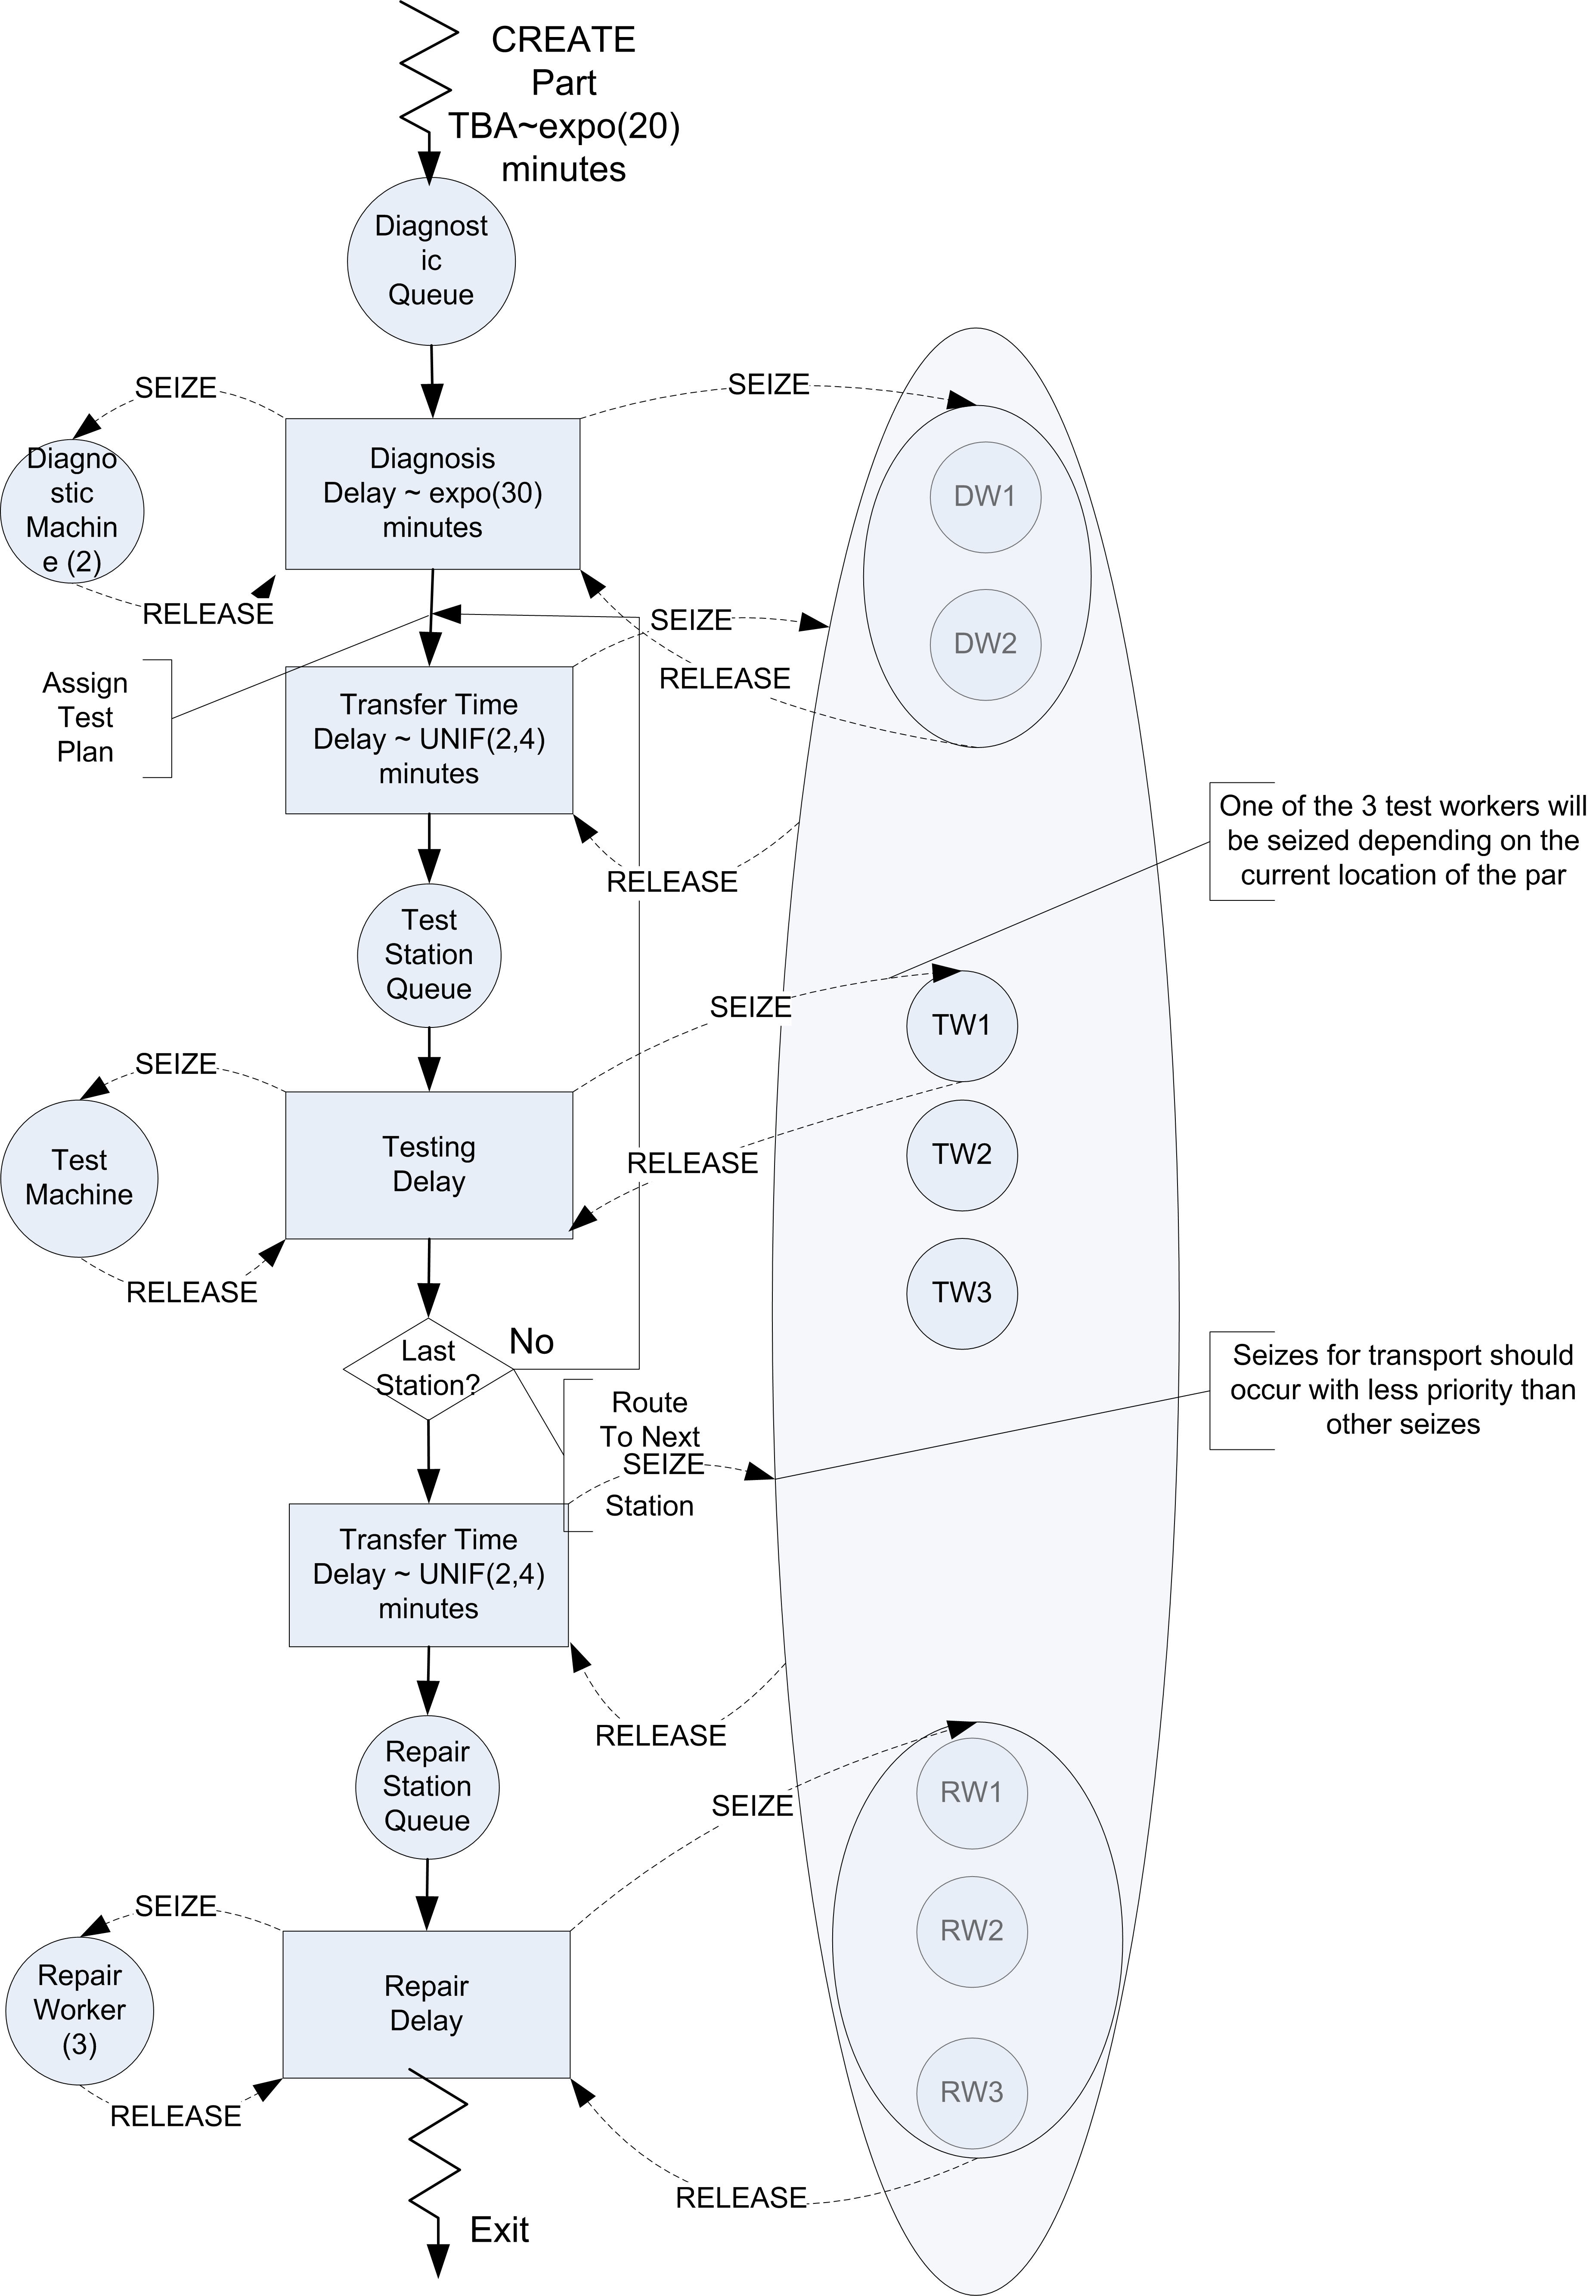
Figure 8.2: Activity diagram for revised test and repair situation
It should be clear from the figure that three pools of resources will be required in this model. A resource pool should be defined for the diagnostic workers with two members. A resource pool should be defined for the three repair workers. Finally, a resource pool should be defined to hold each of the workers DW1, DW2, TW1, TW2, TW3, RW1, RW2, RW3 that are available for transporting parts. Resource pools are discussed in Section 7.1.2.
When a part requires diagnostics, it will seize one of the workers in the diagnostic workers pool. When a part requires testing, it will seize the appropriate test worker for its current station. Finally, at the repair station, the part will seize one of the repair workers. In order to receive transport, the part will seize from the entire pool of transport workers.
8.1.1.1 Implementing Test and Repair Resource Constrained Transfer
Based on Figure 8.2, the basic process for resource constrained transfer should be something like that shown in the following pseudo-code.
SEIZE 1 diagnostic machine
SEIZE 1 diagnostic worker from diagnostic worker set
DELAY for diagnostic time
RELEASE diagnostic machine
RELEASE diagnostic worker

SEIZE 1 worker from worker set
DELAY for transfer time
RELEASE worker

SEIZE appropriate test machine
SEIZE appropriate test worker
DELAY for testing time
RELEASE test machine
RELEASE test worker

SEIZE 1 worker from worker set
IF not at last station
    DELAY for transfer time to next test station
ELSE
    DELAY for transfer time by to Repair
ENDIF

RELEASE worker
SEIZE repair worker
DELAY for repair time
RELEASE repair worker
This logic assumes that each worker has been placed in resource pools. At the diagnostic station both the machine and a diagnostic worker are required. When the part completes the processing at the diagnostic station, the part seizes a worker from the overall set of workers and routes with a transfer delay to the appropriate testing station.
After arriving at the test station, the part releases the worker that performed the transport and proceeds with the seizing of the test machine and worker. Again, prior to the routing to the next station, a worker from the overall set of workers is seized. Notice also that the worker is released after the part is transferred to the repair station.
Now let’s take a look at how to modify the test and repair model from Section 7.1.3 to use these new concepts. The key changes involve the definition of the resource pools that involve the workers at each station. Resource pools are discussed in Section 7.1.2. The diagnostic workers can be defined as follows:
    private val dw1 = Resource(this, name = "DiagnosticsWorker1")
    private val dw2 = Resource(this, name = "DiagnosticsWorker2")
    private val diagnosticWorkers: ResourcePoolWithQ = ResourcePoolWithQ(
        this,
        listOf(dw1, dw2), name = "DiagnosticWorkersPool"
    )
First, the individual resources representing the diagnostic workers are constructed.
Then, the resource pool to hold the diagnostic workers is created by supplying
the resources in a list. The testing workers and the repair workers can be defined in a similar manner:
    private val tw1 = ResourceWithQ(this, name = "TestWorker1")
    private val myTest1: ResourceWithQ = ResourceWithQ(this, "Test1", capacity = 1)
    private val tw2 = ResourceWithQ(this, name = "TestWorker2")
    private val myTest2: ResourceWithQ = ResourceWithQ(this, "Test2", capacity = 1)
    private val tw3 = ResourceWithQ(this, name = "TestWorker3")
    private val myTest3: ResourceWithQ = ResourceWithQ(this, "Test3", capacity = 1)

    private val rw1 = Resource(this, name = "RepairWorker1")
    private val rw2 = Resource(this, name = "RepairWorker2")
    private val rw3 = Resource(this, name = "RepairWorker3")
    private val repairWorkers: ResourcePoolWithQ = ResourcePoolWithQ(
        this,
        listOf(rw1, rw2, rw3), name = "RepairWorkersPool"
    )

    private val transportWorkers: ResourcePoolWithQ = ResourcePoolWithQ(
        this, listOf(tw1, tw2, tw3, dw1, dw2, rw1, rw2, rw3), name = "TransportWorkersPool"
    )
Finally, the resource pool to represent the transport workers can be defined based on the previously declared resources (test workers, diagnostic workers, and repair workers). The remaining declarations for the model are the same as in Section 7.1.3.
Now, the process routine needs to be updated to reflect the use of the pools and the use of transport workers for moving the parts.
    private inner class Part : Entity() {
        val testAndRepairProcess: KSLProcess = process(isDefaultProcess = true) {
            wip.increment()
            timeStamp = time
            //every part goes to diagnostics
            val dd1 = seize(diagnosticWorkers) // worker is needed to use the machine
            val d1 = seize(myDiagnosticMachines)
            delay(diagnosticTime)
            release(d1) // release machine first, because worker is needed to release
            release(dd1)
            val twa = seize(transportWorkers, seizePriority = KSLEvent.MEDIUM_PRIORITY)
            delay(moveTime)
            release(twa)
            // determine the test plan
            val plan: List<TestPlanStep> = planList.randomElement
            // get the iterator
            val itr = plan.iterator()
            // iterate through the plan
            while (itr.hasNext()) {
                val tp = itr.next()
                // visit tester
                val tt1 = seize(tp.tester)// tester needed first to work on machine
                val t1 = seize(tp.testMachine)
                delay(tp.processTime)
                release(t1)
                release(tt1)
                val twa1 = seize(transportWorkers, seizePriority = KSLEvent.MEDIUM_PRIORITY)
                delay(moveTime)
                release(twa1)
            }
            // visit repair
            val rw = seize(repairWorkers)
            delay(repairTimes[plan]!!)
            release(rw)
            timeInSystem.value = time - timeStamp
            wip.decrement()
        }
    }
Notice how the workers are seized before the machine at each station.
            val dd1 = seize(diagnosticWorkers) // worker is needed to use the machine
            val d1 = seize(myDiagnosticMachines)
            delay(diagnosticTime)
            release(d1) // release machine first, because worker is needed to release
            release(dd1)
Also notice the specification of the use of the transport workers when moving to the next location for testing. The seize request for the transport workers has medium priority (as compared to the default high priority for normal seizing of resources.
              val twa = seize(transportWorkers, seizePriority = KSLEvent.MEDIUM_PRIORITY)
              delay(moveTime)
              release(twa1)
Therefore, resource constrained movement can be easily modeled by seizing the required resource for the move; however, the time to move is specified as a delay. The reader is asked to explore the effect of different resource allocation rules on system performance in the exercises. When the modeling of the distance to move is important, then we can use movable resources.